
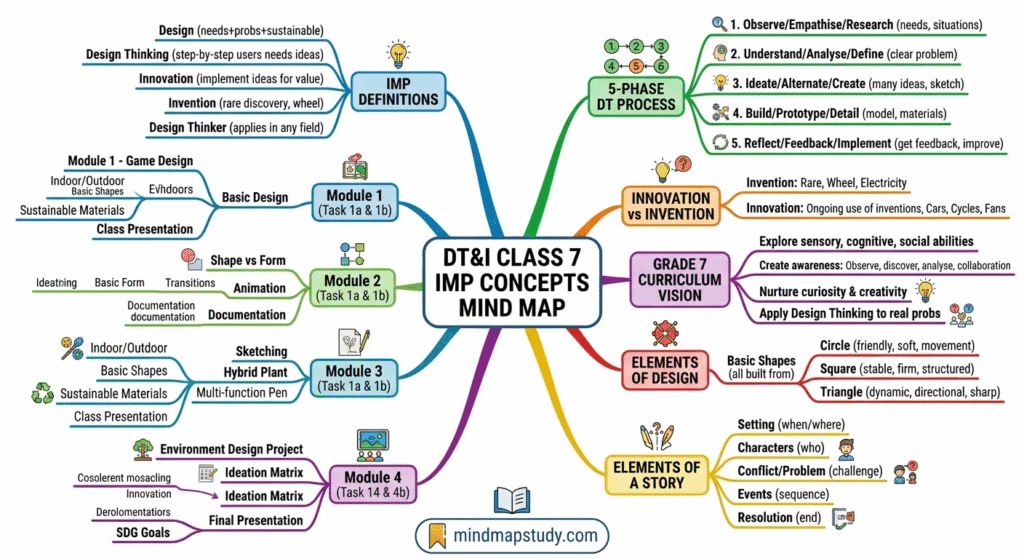
This task-book is published by CBSE (2022) for Grade 7 students. It covers four creative modules plus assessments, spread across 18 hours of hands-on school and home tasks.
Syllabus
| Module | Title | Hours | Credits |
|---|---|---|---|
| 0.0 | Introduction and Overview | – | – |
| 1.0 | Elements of Design + Story-creation | 3 hrs | 3 |
| 2.0 | Exploring Form Transitions + Discovery of Forms in Environment | 3 hrs | 3 |
| 3.0 | Sketching for Ideation + Exploration of Product Ideas | 3 hrs | 3 |
| 4.0 | Introduction to Design Thinking Process + Environment Design Project | 9 hrs | 3 |
| Total | 18 hrs | 18 |
Introduction
0.1 What is Design?
Design is about understanding needs, being sensitive to issues, identifying problems that need to be solved, and creating innovative appropriate solutions. It also considers sustainability so that it makes a positive difference to life in our universe.
Famous quotes on design:
- “Design is not just what it looks like and feels like. Design is how it works.” – Steve Jobs
- “Design is plan for arranging elements in such a way as best to accomplish a particular purpose.” – Charles Eames
- “Design is solution to a problem.” – John Maeda
- “Design is thinking made visual.” – Saul Bass
- “Essentials of design are — purity, precision, details.” – Prof Sudhakar Nadkarni
0.2 Who is a Designer?
A designer is a highly creative person who enjoys solving problems. Their sensitivity to the needs of people allows them to be intuitive and think of opportunities that enhance people’s lives. This sensitivity makes them appreciate the intricate aspects of a problem to improve it through creative designs.
Design career fields:
- Communication / Graphic Design
- Product Design
- Animation Design
- Automobile Design
- Architecture Design
- Environmental Design
- Digital Design
- Textile / Fashion Design
0.3 What is Design Thinking?
Design Thinking is a method to solve problems using a process. It first understands users, identifies and analyses a problem or need, and researches relevant information. After that, ideas are explored and analysed until an appropriate innovative solution is arrived at.
Design Thinking translates an idea into a blueprint for something useful — a vehicle, building, graphic, service, or system.
0.4 Who is a Design Thinker?
A Design Thinker applies the Design Thinking process to solve problems and find creative, innovative solutions in any field or domain — arts, social sciences, law, medicine, engineering, business, or even at home.
Whether it is a simple or complex problem, a design thinker finds creative ways to tackle it. If everyone adopted this method, society would move toward being more creative and solution-focused.
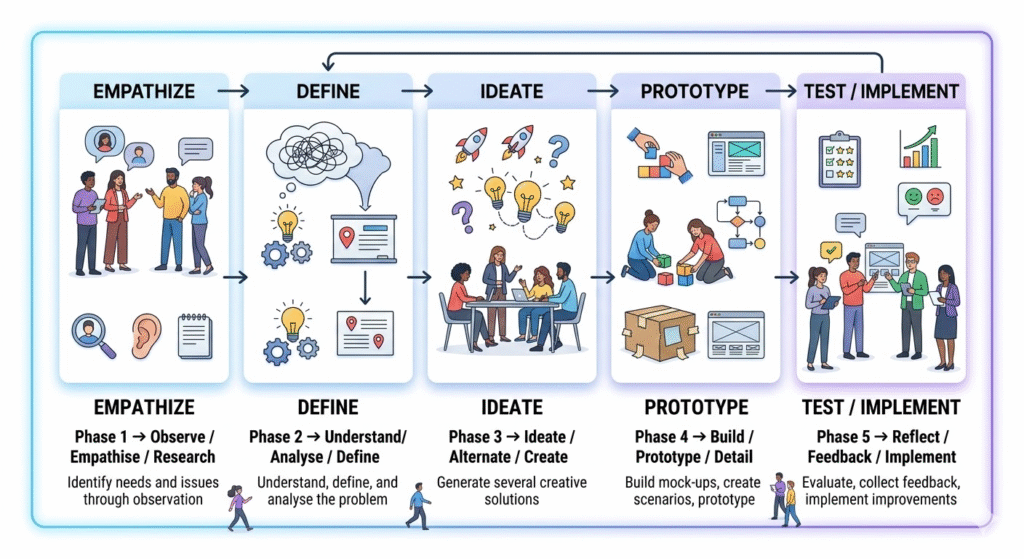
0.5 What is the Design Thinking Process?
The process has five phases:
0.6 What is Innovation?
Innovation involves implementing something new and replacing or reframing an existing mindset. It translates a concept, idea, thought, or invention into products and services that create value in life.
| Term | Meaning | Example |
|---|---|---|
| Invention | A new discovery; happens rarely | Wheel, Electricity |
| Innovation | New uses of an invention to create value | Cars, Fans, Bicycles, Turbines |
Each invention can produce millions of innovative products. Design pursues the creativity of innovation.
0.7–0.11 Overall Vision, Objectives, Competencies
The DT&I curriculum aims to:
- Explore sensory, cognitive, and social abilities of students.
- Create awareness through observation, discovery, analysis, collaboration, and reflection.
- Nurture curiosity and enhance explorative abilities.
- Foster creativity and innovation.
- Apply Design Thinking to identify and solve various problems.
- Learn the fundamentals of the creative design discipline.
Additional competencies developed:
- Enhanced observation skills
- Improved sensitivity to design
- Better communication and presentation skills
SDG Goals linked to this course: Quality Education (4), Gender Equality (5), Industry/Innovation/Infrastructure (9), Reduced Inequalities (10), Responsible Consumption (12), Life Below Water (14), Life on Land (15).
0.12 Grading
| Grade Awarded | Code | Points |
|---|---|---|
| Outstanding | O! | 10+ (Extra Points) |
| Above Excellent | A1 | 10 |
| Excellent | A2 | 9 |
| Above Proficient | B1 | 8 |
| Proficient | B2 | 7 |
| Above Promising | C1 | 6 |
| Promising | C2 | 5 |
| Above Developing | D1 | 4 |
| Developing | D2 | 3 |
| Above Beginning | E1 | 2 |
| Beginning | E2 | 1 |
Formula:
Credits for Module = Sum of Grades for all Tasks / Total Credits for the Module
0.13–0.16 Assessment, Feedback, Exhibition
- Assessment uses a criteria matrix with levels from Beginning to Excellent for each task.
- Both students and teachers provide feedback so improvements can be made for future years.
- All visual task outputs are displayed as an exhibition in classrooms or common areas, or presented as group presentations within school.
1.0 Module 1 – Introduction to Elements for Design and Story-creation
Introduction
This module introduces the three basic elements of design through shapes — Circle, Square, and Triangle — and the basics of story creation. Students explore two tasks: one game-design task at school and one story task at home.
Aim: Build curiosity about design through shapes as building blocks. Use imagination and creativity to create stories and games, applicable in design, media, and performing arts.
Equipment: Chart paper (270 GSM), drawing paper, scissors, pencils, clay, sketchbook.
Elements of Design – Circle, Square, Triangle
Each shape carries its own personality and association:

These three shapes, in different combinations and arrangements, can form any object, game piece, character, or visual design.
Elements of a Story / Narrative
A well-built story needs:
- Setting – where and when it happens.
- Characters – who is in the story.
- Problem / Conflict – the challenge or obstacle.
- Events – the sequence of what happens.
- Resolution – how the problem is solved.
1.1 Task 1a – Create an Interesting Simple Game Using Basic Shapes
At school, in groups of 3–4. School hours: 2.
Topic: Create an Interesting Simple Game using Basic Shapes of the Elements of Design.
- The game can be indoor or outdoor.
- Clues: tiles on a floor, shapes you can wear, coloured shapes you hide, board games with basic elements, etc.
- Try using reusable or recycled materials.
Steps:
- Use Chart paper or thick drawing paper (270 GSM).
- Ideate on possible themes or subjects using the elements of design.
- Decide: indoor game or outdoor game.
- Decide which age group will play the game.
- Make a plan of how the game would be played.
- Figure out the sequence in which the game is played.
- Name your character and note what is interesting about it.
- Decide the number of participants/players.
- Make a rough prototype and try it out with actual players.
game concept example:
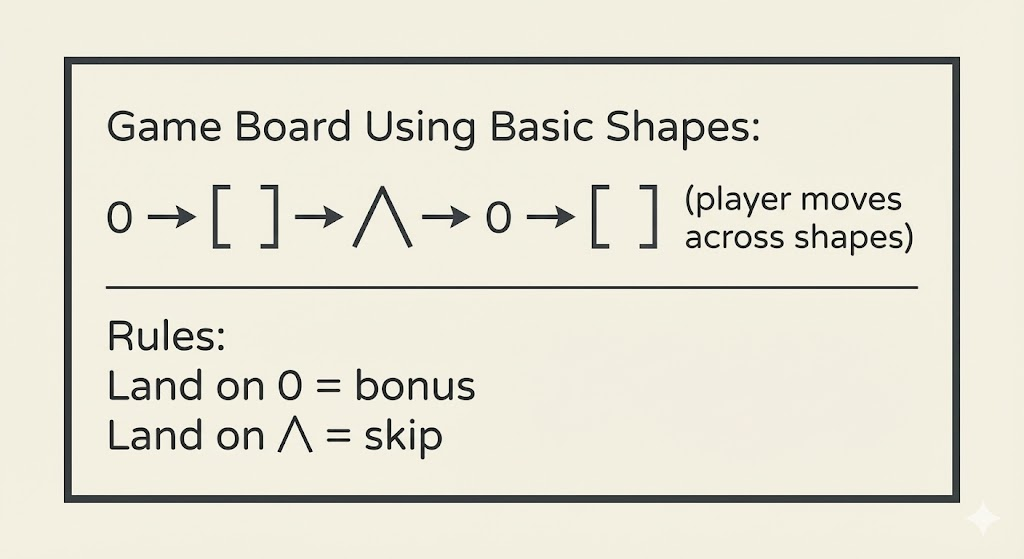
Output 1a: Demonstrate and present the game to classmates and teacher.
1.2 Task 1b – Adventure Story / Journey to School
At home, individually. Home hours: 1.
Option 1 – Adventure Story of a Boy and Girl Coming to School:
- Create an interesting adventure story about a boy and girl who face challenges trying to reach school on time.
- Write the story in around 150 words.
- Draw a sketch / illustration to go with your story on A4 paper.
- Add colours.
Option 2 – Journey from Your House to School:
- Observe and note down interesting things and memorable experiences during your journey from home to school.
- Photograph interesting sights and use them as reference for drawing.
- Write a short story of around 100 words about your experiences.
- Draw a sketch / illustration to go with your story.
Output 1b: Short write-up of the story + visual sketch / illustration.
Reflection – Module 1
Think about:
- Can the game be made using sustainable materials?
- Can a concept or learning be taken from playing this game?
- Can the game be further developed into a finished prototype?
- Can the game be documented for your portfolio?
Assessment Criteria – Module 1
| Criteria | Type | Levels |
|---|---|---|
| Game design and construction: original, uses basic shapes creatively | Group | Beginning → Excellent |
| Game demonstrated and presented clearly to the audience | Group | Beginning → Excellent |
| Collaboration and demonstration: engaging, creative, original ideas shown | Group | Beginning → Excellent |
| Story about journey to school: original, creative, clearly represents vision | Individual | Beginning → Excellent |
2.0 Module 2 – Exploring Form Transitions + Forms in Environment
Introduction
This module introduces form transitions — how one shape or form changes into another through intermediate steps. This is a basic principle behind animation design.
- Students use paper cutouts or soft clay to transform one shape to another across multiple steps.
- At home, students find and photograph symmetry, patterns, and textures in their surroundings.
Aim: Develop sensitivity to changes in form. Understand that form transitions are the basis of moving images. Learn to see and document design elements in everyday environments.
Equipment: Sketchbook, drawing paper, scissors, pencils, clay, mobile phone with camera.
Shape vs Form
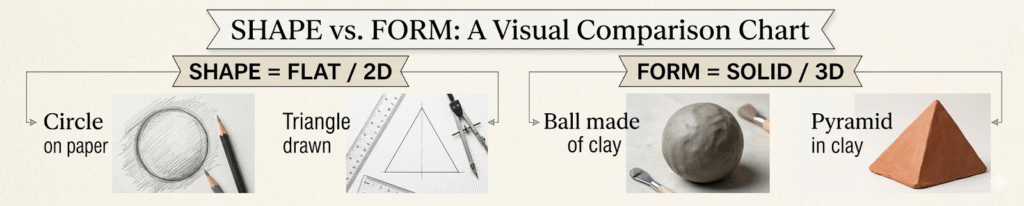
2.1 Task 2a – Exploring Transitions in Shapes and Forms
At school, in groups of 3–4. School hours: 2.
Grade 7 uses double transitions — from one shape to another, and then to a third:
- Example with geometric shapes: Circle → Star → Triangle (5+5 steps)
- Example with natural forms: Rose → Sunflower → Lotus
Steps:
- Choose two or three shapes/forms to transition between.
- Draw or make (in clay) the end shapes at approximately 10 cm size.
- Create the middle shape in between the two ends.
- Then create in-between steps on each side of the middle.
- Arrange the 5+5 transitions in order.
- Cut out paper shapes and arrange in sequence.
- Colour them so the colour gradually changes from start to end.
transition example:
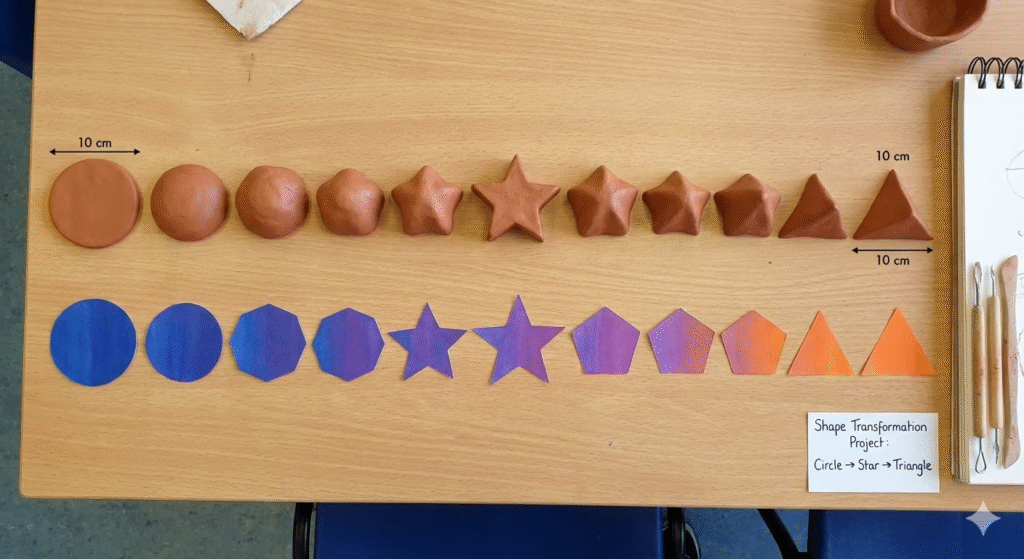
Output 2a: Paper cut-outs or clay models showing the 5+5 step shape/form transition.
2.2 Task 2b – Animating by Stringing or Flipbook (Optional)
At school.
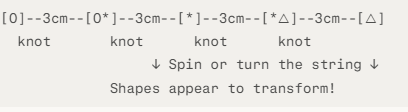
Method A – Stringing the Transitions:
- String all 10 shapes/forms on a thread with a 3 cm gap between each.
- Make a hole in the centre of each shape.
- Make knots on the string at intervals of 3 cm.
- Turn or spin the string and watch the transition of shapes in motion.
string diagram:
Method B – Making a Flipbook:
- Draw each of the transition steps on separate sheets of paper.
- Stack and staple the sheets together as a flipbook.
- Flip the pages rapidly to see the shape transform.
Output 2b: Strung-up shape transitions or a flipbook of shape transitions.
2.3 Task 2c – Discovering Forms in the Environment
At home, individually. Home hours: 1.
Photograph any one (or a combination) of the following from nature or your surroundings:
- A. Symmetry – in natural or man-made environments.
- B. Patterns – in objects, plants, or animals.
- C. Textures – in nature or objects.
Steps:
- For each subject, take at least 3 alternative shots.
- Select the best 1 from each set.
- Your final collection = 6 selected photographs.
- Ensure good lighting and proper composition in each photo.
concept examples:
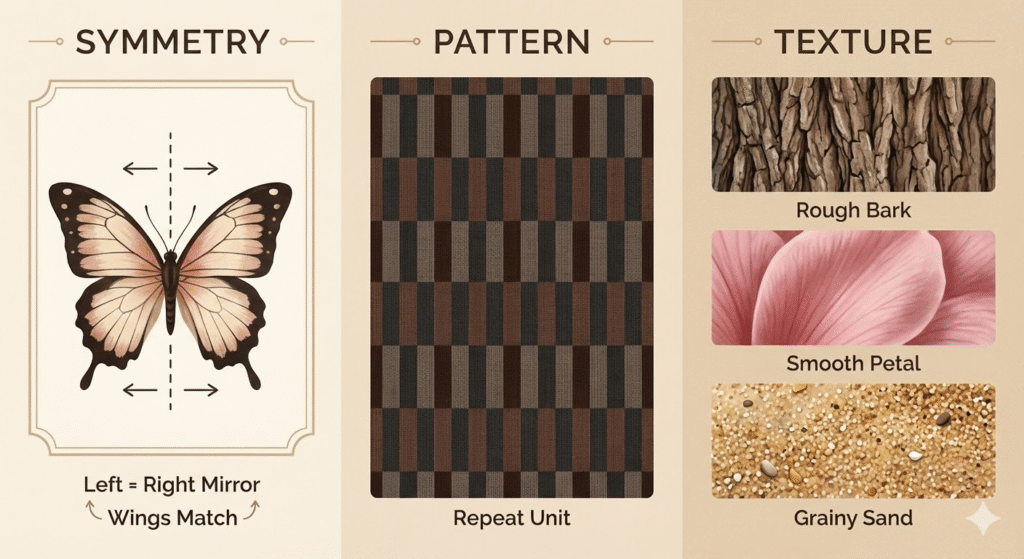
Output 2c: 6 selected photographs arranged in a sequence.
Reflection – Module 2
Think about:
- Where else are form transitions important — logos, cartoons, short films?
- Will you look for shapes, colours, textures, and patterns in the environment around you?
- Can you start identifying different types of trees, birds, and insects?
- How do forms change subtly within a family of living beings?
Assessment Criteria – Module 2
| Criteria | Type | Levels |
|---|---|---|
| Creating 2+2 end shapes/forms in paper or clay | Group | Beginning → Excellent |
| In-between transitions shown clearly | Group | Beginning → Excellent |
| Sensitivity to new forms created by transitions | Group | Beginning → Excellent |
| Documenting symmetry, patterns, textures from environment | Individual | Beginning → Excellent |
3.0 Module 3 – Sketching for Ideation + Exploration of Product Ideas
Introduction
This module introduces sketching as a thinking tool. The simplest way to capture an idea is to pick up a pencil and sketch it on paper. Sketching is an extension of thinking — it produces visual representations of ideas.
The second part of the module focuses on exploring multiple variations of an idea. In design, thinking of several alternatives gives the freedom to choose the best solution.
Aim: Learn to sketch ideas for product concepts. Understand that exploring many alternatives leads to better design decisions.
Exposures:
- Idea sketching by scientists and designers.
- Film “Powers of Ten” (based on the 1957 book Cosmic View) — exploring scale from the universe to a single cell.
- Creative product design ideas for scissors or cycles as examples.
Powers of Ten – Concept
The film “Powers of Ten” explores scale at every level:
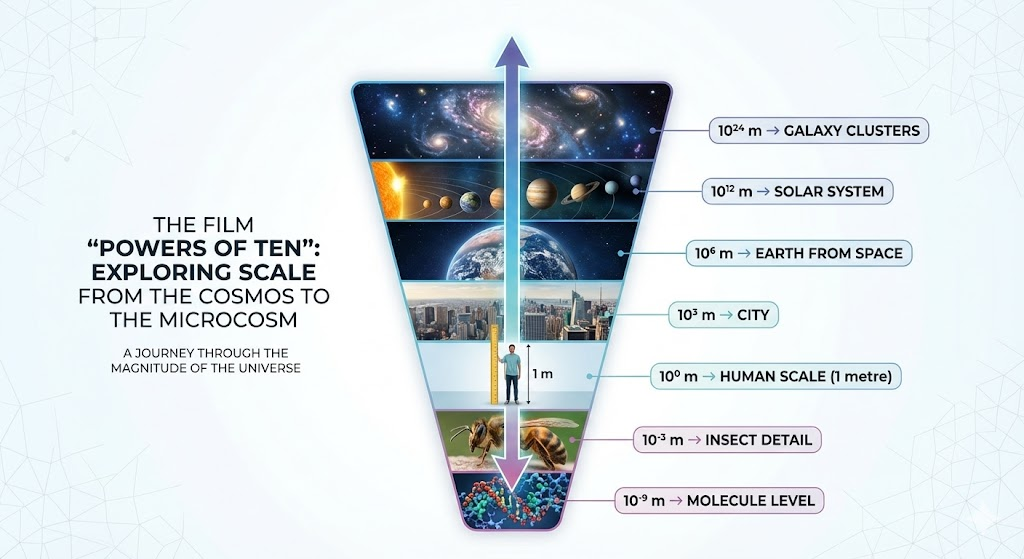
This teaches students that observing at every scale reveals new forms, patterns, and design possibilities.
3.1 Task 3a – Sketch Characteristics of Hybrid Plants or Design a Multi-function Pen
At school, individually and in group discussion.
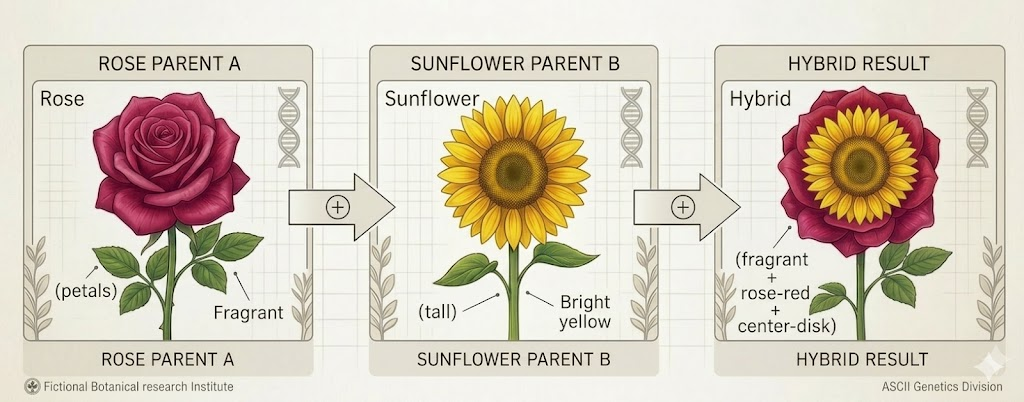
Option A – Study and Sketch Characteristics of Hybrid Plants
A hybrid plant is created by combining the characteristics of two different plants to produce a new plant with better qualities.
Steps:
- Observe and research what hybrid plants are — example: a hybrid of a rose and a sunflower.
- Think about which qualities from each plant you want to keep.
- Sketch at least 4–5 alternative hybrid designs — each combining different traits.
- Note down:
- Name of the parent plants.
- What new quality the hybrid would have.
- Describe the leaves, stem, flowers, colour.
hybrid plant example:
Option B – Design a Pen or Pencil with Additional Uses / Functions
Think of a pen or pencil that can do more than just write.
Possible additional functions:
- A pen with a ruler on its side.
- A pen that also functions as a bookmark.
- A pencil with a built-in eraser on both ends.
- A pen with a stylus tip for touch screens.
- A pencil with a compact magnifying glass attached.
Steps:
- Sketch 4–5 different concept ideas quickly.
- Explore different forms:
- Linear (straight, long)
- Curved surfaces
- 3D / Solid with depth
- Choose the best concept from all your sketches.
pen concept example:

Output 3a: Multiple concept sketches; best idea chosen.
3.2 Task 3b – Convert Concept into a Final Drawing
At home, individually. Home hours: 1.
Steps:
- On A4 drawing paper, make a neat final drawing of your chosen concept.
- Ink the final drawing using a 0.5 ink pen.
- Colour with colour pencils.
- Label all the different parts clearly.
- Mention the materials used.
- Give a name to your design.
- Write a few lines explaining how it works.
Output 3b: Final inked, coloured, and labelled drawing with name, materials, and working description.
Reflection – Module 3
Think about:
- What design thinking principles did you use in this task?
- How does sketching help you think better about a problem?
- Can you carry a small sketchbook and record ideas regularly?
- Can you take your best sketch to a finished prototype?
Assessment Criteria – Module 3
| Criteria | Description | Levels |
|---|---|---|
| Understanding of subject (hybrid plant or pen) | Conceptual clarity in sketches | Beginning → Excellent |
| Quality of sketches showing design ideation | Clear, communicative, shows thinking | Beginning → Excellent |
| 4–5 sketches exploring creative variations | Linear, curved, 3D, planar forms explored | Beginning → Excellent |
| Sensitivity to alternate concepts | Awareness of form variations in design | Beginning → Excellent |
4.0 Module 4 – Introduction to Design Thinking Process + Environment Design Project
Introduction
This is the largest module where you apply the full 5-phase Design Thinking process to solve a real problem found just outside your school environment.
Design Thinking is a process that first understands users, identifies and analyses a problem, researches relevant information, explores ideas, and arrives at an appropriate and useful solution. It can be applied to economics, products, services, health, environment, and more.
Exposures:
- Slideshow: What is the Design Thinking Process (12 slides).
- Slideshow: Using sticky notes to categorise information and how to do mind-mapping.
- Slideshow: A complete design case study using the Design Thinking process.
Task Overview:
| Task | Location | Focus | Hours |
|---|---|---|---|
| 4a | School | Observe and identify problems outside school | 2 hrs |
| 4b | School | Ideation, matrix, short-listing | 2 hrs |
| 4c | Home + School | Scenarios, mock-ups, detailing | 3 hrs home + 1 hr school |
| 4d | School | Final presentation | 1 hr |
4.1 Task 4a – Identify Problems in the Outside School Environment
At school, in groups of 3–4. School hours: 2.
Topic: Observing and Documenting the Environment Just Outside School.
Steps:
- Walk just outside your school area and observe carefully.
- Take photos or make sketches of areas with visible problems.
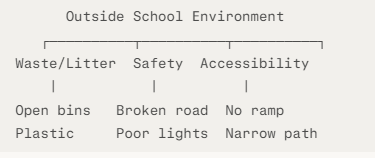
- Note both positive aspects and problems under themes:
- Safety
- Cleanliness and waste
- Accessibility
- Noise
- Greenery and environment
- Infrastructure
- Create a table of observations.
- Use sticky notes or mind maps to categorise problems.
- List solvable problems and agree on one clear problem statement.
mind map – outside school:
Output 4a: 5 presentation slides:
- Slide 1: Title + Problem statement + team names.
- Slide 2: Photo/sketch documentation.
- Slide 3: Observation table.
- Slide 4: Categorisation / mind map.
- Slide 5: Final short-listed list of solvable problems.
4.2 Task 4b – Ideation and Creative Options
At school, in groups. School hours: 2.
Topic: Ideation, Creative Options, and Short-listing of Concepts.
Steps:
- Brainstorm possible solutions — sketch all ideas, however rough.
- Place all ideas on an ideation matrix:

- Collate all good ideas together.
- Short-list ideas based on:
- Usefulness
- Ease of implementation
- Low cost
Output 4b: 3 presentation slides:
- Slide 1: Alternate idea sketches.
- Slide 2: Cost vs ease matrix.
- Slide 3: Short-listed best idea.
4.3 Task 4c – Creating Scenarios, Mock-ups, and Detailing
At home (3 hours) + school (1 hour), individually then group.
Topic: Creating Scenarios, Design Mock-ups, and Detailing.
Steps:
- Select the best solution from Task 4b.
- Create a scenario in 5 steps showing how a real person would use your solution:
Step 1: Problem situation shown
Step 2: Person notices the problem
Step 3: Person uses your design solution
Step 4: Positive outcome begins
Step 5: Problem solved – better environment shown
- Make a mock-up using cardboard, wire, paper, or easily available materials.
- Detail out the final solution:
- Shape and form
- Materials to be used
- Advantages and disadvantages
- How to implement and maintain
Output 4c: 3 presentation slides:
- Slide 1: Scenario (5 steps with characters).
- Slide 2: Photographs of the mock-up from multiple angles.
- Slide 3: Detailing (shape, materials, advantages, implementation).
4.4 Task 4d – Final Design Solution Presentation
At school, in groups. School hours: 1.
Topic: Final Design Solution Presentation.
Prepare a 5-minute presentation in 12 slides total:
- 5 slides from Task 4a (title, docs, table, mind map, problem list).
- 3 slides from Task 4b (sketches, matrix, short-listed idea).
- 3 slides from Task 4c (scenario, mock-up, details).
- 1 slide for full references and acknowledgements.
Additional:
- Present in the classroom as a group.
- Set up an exhibition in the classroom or exhibition room.
- Invite other staff and students to view the project.
Reflection – Module 4
Think about:
- What were the most interesting phases of the Design Thinking process for you?
- What did you discover about the environment just outside your school?
- Which SDG goals are connected to the problem you solved?
- How will your solution improve the lives of people in that area?
Assessment Criteria – Module 4
| Criteria | Type | Levels |
|---|---|---|
| Observation documentation (photos, table, mind map) | Group | Beginning → Excellent |
| Clarity of problem statement | Group | Beginning → Excellent |
| Ideation sketches and quality of matrix | Group | Beginning → Excellent |
| Scenario in 5 steps with characters | Group | Beginning → Excellent |
| Mock-up: creativity, materials, construction | Group | Beginning → Excellent |
| Detailing: materials, advantages, implementation steps | Group | Beginning → Excellent |
| Final presentation: clarity, completeness, creativity | Group | Beginning → Excellent |
5.0 Assessments and Feedback Forms
All four modules use the same achievement level framework:
| Level | Score Range | Description |
|---|---|---|
| Beginning | 1–2 | Task partially attempted; needs significant support |
| Developing | 3–4 | Basic attempt with notable gaps |
| Promising | 5–6 | Reasonable attempt with limited depth |
| Proficient | 7–8 | Clear understanding, good execution |
| Excellent | 9–10 | Detailed, creative, well-presented, original |
The task grade formula is:
Grade for Task = Grade / Points (Marks)
Credits for Module = Sum of Grades for all Tasks / Total Credits for the Module
This mind map contains all important topics of this chapter
Visit our Class 7 Skill Development page for free mind maps of all Chapters