
Introduction and Overview
What is Design?
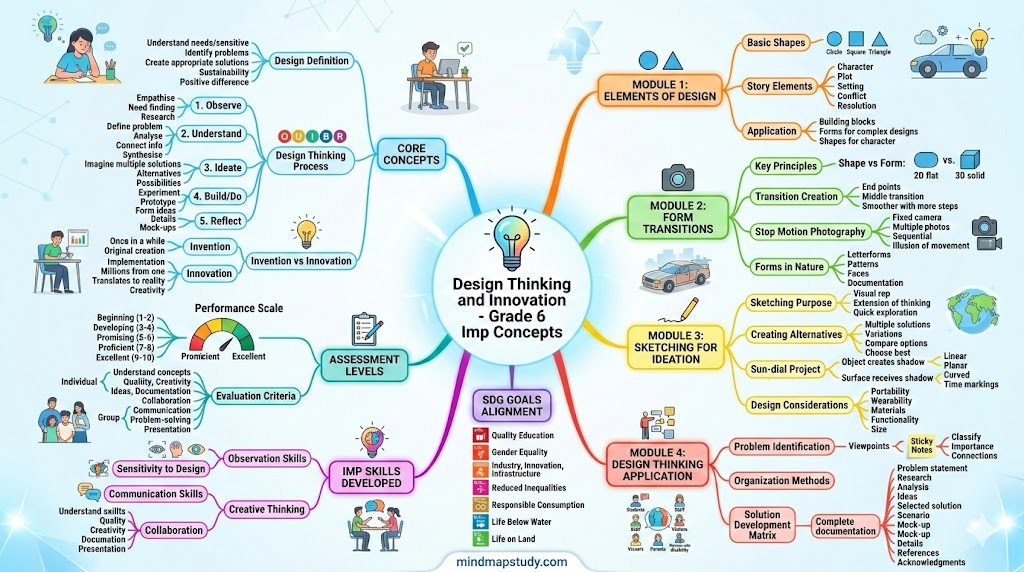
Design is about understanding needs and being sensitive to issues around us. It involves identifying problems that need solutions, creating innovative and appropriate answers, and thinking about sustainability. The goal is to make a positive difference in our world.
Here are some inspiring thoughts from famous designers:
- John Maeda says: “Design is solution to a problem”
- Prof Sudhakar Nadkarni believes: “Essentials of design are- purity, precision, details”
- Saul Bass states: “Design is thinking made visual”
- Charles Eames explains: “Design is plan for arranging elements in such a way as best to accomplish a particular purpose”
- Steve Jobs shares: “Design is not just what it looks like and feels like. Design is how it works.”
Who is a Designer?
A designer is a creative person who loves solving problems. Designers are sensitive to people’s needs and understand issues in society. This sensitivity helps them think of opportunities that can make life better for everyone.
Career Options in Design:
- Communication/Graphic Design
- Product Design
- Animation Design
- Automobile Design
- Architecture Design
- Environmental Design
- Digital Design
- Textile/Fashion Design
What is Design Thinking?
Design Thinking is a method to solve problems using a process. It helps create something new and useful. The process works like this:
- Understand users – Learn about people who will use your solution
- Identify and analyze – Find out what the problem really is
- Research information – Gather facts and details
- Explore ideas – Think of many different solutions
- Analyze options – Choose the best solution
- Create the solution – Make it real
Design Thinking translates ideas into useful things like vehicles, buildings, graphics, services, or systems.
Who is a Design Thinker?
A Design Thinker applies the Design Thinking process to solve problems in any field – arts, science, law, medicine, engineering, business, and more. You can use it to solve problems at home, in your neighborhood, or at work. Both simple and complex problems can be tackled using creative thinking.
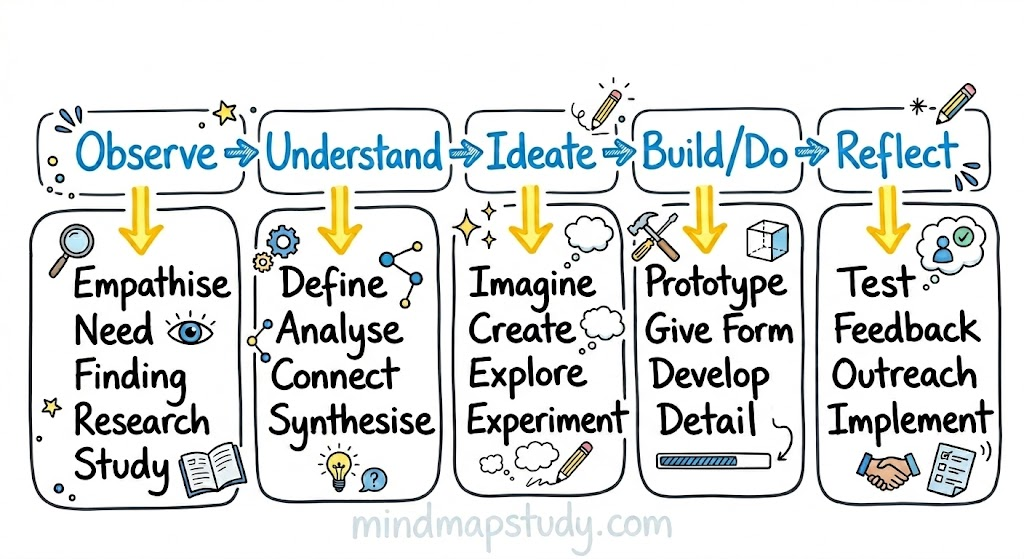
The Design Thinking Process (OUIBR)
The process has five phases:
Phase 1: Observe/Empathise/Research
- Identify needs through observation
- Understand people’s feelings
- Study the situation
Phase 2: Understand/Analyse/Define
- Make sense of what you learned
- Clearly define the problem
- Analyze all aspects
Phase 3: Ideate/Alternate/Create
- Generate many creative solutions
- Think of different approaches
- Explore possibilities
Phase 4: Build/Prototype/Detail
- Create mock-ups
- Make prototypes
- Add all details
Phase 5: Reflect/Feedback/Implement
- Get opinions from others
- Make improvements
- Put the solution to work
Visual Representation:
What is Innovation?
Innovation means implementing something new and changing existing mindsets. It transforms concepts, ideas, or inventions into useful products and services that create value in life.
Difference between Innovation and Invention:
- Invention happens once in a while
- Each invention can lead to millions of innovative products
- Example: The wheel was invented once, but it continues to produce countless innovative products
Vision and Aims of Design Thinking and Innovation Curriculum
Explore student abilities:
- Sensory abilities (how we sense things)
- Cognitive abilities (how we think)
- Social abilities (how we interact)
Create awareness through:
- Observation
- Discovery
- Analysis
- Experience
- Collaboration
- Reflection
Nurture curiosity and enhance:
- Explorative abilities
- Creative thinking
Foster creativity and innovation by:
- Identifying problems
- Finding solutions
- Applying Design Thinking process
Learn fundamentals:
- Basics of creative design discipline
- Methods and techniques
The curriculum also promotes solving problems related to Sustainable Development Goals (UN) and incorporates Indian Knowledge Systems.
Module Overview for Grade 6/7/8
Overall Vision
- Explore Sensories
- Create Awareness and sense of Discovery
- Nurture Curiosity and Creative Explorations
- Experience Problem-solving and Reflection
Overall Learning Objectives
- Introduction to Elements of Design and Story-creation
- Observe and Discover Forms in Environment
- Explore Form Transitions
- Fundamentals of Sketching
- Product Concepts Explorations
- Fundamentals of Design Thinking Process
Additional Competencies
- Enhance Observation Skills
- Improve Sensitivity to Design
- Improve Communication and Presentation skills
Matching SDG Goals
The curriculum aligns with these Sustainable Development Goals:
- Goal 4: Quality Education
- Goal 5: Gender Equality
- Goal 9: Industry, Innovation and Infrastructure
- Goal 10: Reduced Inequalities
- Goal 12: Responsible Consumption and Production
- Goal 14: Life Below Water
- Goal 15: Life on Land
Grading System
Grade Points:
| Grade | Level | Points |
|---|---|---|
| O! | Outstanding | 10 (Extra Points) |
| A1 | Above Excellent | 10 |
| A2 | Excellent | 9 |
| B1 | Above Proficient | 8 |
| B2 | Proficient | 7 |
| C1 | Above Promising | 6 |
| C2 | Promising | 5 |
| D1 | Above Developing | 4 |
| D2 | Developing | 3 |
| E1 | Above Beginning | 2 |
| E2 | Beginning | 1 |
Assessment Levels
Assessment Matrix:
| Level | Score | Description |
|---|---|---|
| Beginning | FF-EF-EE (0.0-0.2) | Starting to learn |
| Developing | DE-DD (0.3-0.4) | Making progress |
| Promising | CD-CC (0.5-0.6) | Showing potential |
| Proficient | BC-BB (0.7-0.8) | Good understanding |
| Excellent | AB-AA (0.9-1.0) | Exceptional work |
Module 1: Introduction to Elements for Design and Story-creation
Time Required: 2 hours at school + 1 hour at home
Module Introduction
This module introduces basic Elements of Design using shapes – Circle, Square, and Triangle. You will also learn about Story Creation. The module has two tasks:
Task 1a (School): Create a puppet character using basic shapes from paper cut-outs, make a story, and enact it
Task 1b (Home): Create an imaginary character that can do things you cannot do, OR draw “The World in your Palms”
Module Aim
You will learn to use forms as building blocks and create your own stories using imagination and creativity. This knowledge applies to many fields including design, media, and performing arts.
Task Details
Location: School and Home Grouping: Groups of 3-4 for school tasks, individual for home tasks Equipment: Sketchbooks, paper, drawing paper, chart paper, scissors, pencils, clay
Exposures:
- Elements of Design – Circle, Square, Triangle and their characteristics
- Elements of Story/Narratives (Types, forms, structure)
Task 1b: Imaginary Character or The World in Your Palm
Option 1: Imaginary Character
Steps:
- Think of a character that can do things you cannot do
- Draw this on A4 paper
- Sketch and color it
- Write a short story about it (around 150 words)
Option 2: The World in Your Palm
Steps:
- Trace the outline of your palm on A4 paper
- Inside this outline, draw your vision of what the world should be
- Draw and color your vision
- Write a short description (around 100 words) titled “The World in your Palm”
Output: Write-up + Visual sketch
Questions to Think About
- Could you use sustainable materials for puppet making?
- Could your story have social relevance?
- Can the puppets be used for creating multiple stories?
- Can all puppets with their characteristics be displayed as an exhibition?
Assessment Criteria for Module 1
Puppet Design and Construction (Individual):
- Beginning: Needs to start making puppets beyond basic outline
- Developing: Puppets mostly complete, some pieces fell off
- Promising: Puppets constructed fairly well, understands form as building blocks
- Proficient: Puppets original and well constructed, motivated to explore
- Excellent: Puppets original, creative, capture essence of design elements
Puppet Manipulation (Individual):
- Beginning: Needs to complete puppets
- Promising: Puppeteers sometimes manipulated puppets
- Excellent: Puppeteers always manipulated puppets and integrated with story
Story Creation (Group):
- Beginning: Needs to start developing story
- Developing: Story has weak plot and organization
- Promising: Story has plot but confusing structure, few details
- Proficient: Some evidence of original ideas, organization and structure
- Excellent: Strong organization with all story elements, vivid supporting details
Collaboration and Enactment (Group):
- Beginning: Needs to start working on enactment
- Developing: Most voices were monotone
- Promising: Some storytellers showed expression
- Proficient: Most storytellers showed expression, good collaboration
- Excellent: Clear evidence of creativity, all showed expression and emotion
Imaginary Character/World in Palm (Individual):
- Beginning: Needs to start
- Developing: Limited creativity
- Promising: Shows some creativity
- Proficient: Shows creativity
- Excellent: Original, creative, clearly represents vision
Short Story/Write-up (Individual):
- Beginning: Needs to start
- Developing: Limited writing
- Promising: Average writing
- Proficient: Good writing
- Excellent: Novel and well-written
Module 2: Exploring Form Transitions + Forms in Environment
Time Required: 2 hours at school + 1 hour at home
Module Introduction
This module teaches basic principles of form transitions – how shapes change from one to another. This is the foundation of animation design. You will use paper cutouts or clay to see transformation of forms.
Task 2a (School): Create five transitions from one letter to another, optionally animate through stop-motion photography
Task 2b (Home): Document through photography: Letterforms, Patterns, or Faces in Objects from nature or home
Module Aim
You will become sensitive to changes in form and understand that this knowledge applies to product, communication, and animation design.
Task Details
Location: School and Home Grouping: Groups of 3-4 for school, individual for home Equipment: Smartphone with camera, sketchbooks, paper, drawing paper, scissors, pencils, clay
Exposures:
- Fundamentals/basics of Form Transitions
- Forms and patterns in environment and man-made objects
Task 2a: Exploring Transitions in Shapes and Forms
Main Task: Make transitions between two shapes or forms.
Understanding shapes vs forms:
- Shape = flat, two-dimensional (2D)
- Form = solid, three-dimensional (3D)
Steps:
- Choose your method: Paper cutouts OR soft clay
- Pick two letters: Example – transform letter ‘A’ to letter ‘B’ in 5 steps
- Create the transitions:
A → (step 1) → (step 2) → (step 3) → (step 4) → B - Helpful tip:
- First draw/create the two end letters in same size
- Then do the middle shape (step 2)
- Then do the shapes between middle and ends (steps 1 and 3)
- This creates smoother transitions
- For paper cutouts:
- Draw all 5 variations
- Cut around outlines with scissors
- Arrange in order of transition
- Optional: Color each so color gradually changes too
- For clay:
- Create 5 forms showing gradual change
- Keep same size throughout
Output: Paper cut-outs/clay models of transition
Task 2b (Optional): Animating Through Stop Motion
Steps:
- Set up camera: Use mobile camera stand OR stack books on both sides, place rulers across, rest camera on top
- Take photographs:
- Photograph each of the 5 transitions separately
- Keep camera in same position for all photos
- Don’t move the camera between shots
- Create animation:
- Paste photos on 5 slides
- Play slides one after another
- The shape will appear to transform
- For smoother animation:
- Instead of 5 transitions, create 9 transitions
- More steps = smoother transformation
Output: Stop Motion Photo sequence of the transition
Task 2c: Discovering Forms in the Environment
Choose ONE topic to photograph:
A. Alphabets/Letterforms from Nature
- Look for letter shapes in trees, branches, leaves, etc.
B. Patterns in Environment
- Find patterns in objects, plants, or animals
- Look for repeating designs
C. Faces in Objects
- Discover objects that look like faces
- Can be from nature or man-made items
Steps:
- Take photos: Shoot at least 3 alternatives for each subject
- Select best: Choose the best photo from your options
- Final collection: Have 6 final photos documenting forms from environment
- Check quality:
- Ensure good lighting
- Make sure subject is properly composed
Output: Selected photos arranged in sequence
Questions to Think About
- In which other instances are form transitions important?
- Will you look for inspiration of shapes, colors, textures, structures from environment/nature?
- Can you start identifying different types of trees, birds, and insects?
- How do forms change subtly within a family of living beings?
Assessment Criteria for Module 2
Creating Letters/Forms (Group):
- Beginning: Needs to complete creating an alphabet
- Developing: Documents one alphabet using paper/clay
- Promising: Documents 1-2 alphabets
- Proficient: Documents 3-4 alphabets
- Excellent: Creates the 2 end shapes/forms for task
Discovering In-between Shapes (Group):
- Beginning: Needs to complete transition form
- Developing: Creates a transition form
- Promising: Creates 1-2 transitions with middle shape
- Proficient: Creates 3-4 clear transitions
- Excellent: Creates transitions clearly showcasing in-between letters
Sensitivity to New Forms (Group):
- Beginning: Poor sensitivity to changes
- Developing: Very limited sensitivity
- Promising: Average sensitivity
- Proficient: Shows sensitivity to changes
- Excellent: Heightened sensitivity to changes in shape and form
Discovering Forms in Nature (Individual):
- Beginning: Not able to document identifiable forms
- Developing: Limited ability to document
- Promising: Average ability to document
- Proficient: Able to document
- Excellent: Easily documents identifiable forms from environment
Module 3: Sketching for Ideation + Exploration of Product Ideas
Time Required: 2 hours at school + 1 hour at home
Module Introduction
This module teaches sketching for ideation – using sketches to represent ideas and concepts. The easiest way is to take a pencil and sketch ideas on paper. Sketching becomes an extension of your thinking.
The second part teaches creating several variations of ideas. In design, it’s important to think of alternative solutions to choose the best one.
Task 3a (School): Sketch different types of Sun-dials and note different names of Sun
Task 3b (School): Design a portable sun-dial you can carry or wear
Task 3c (Home): Convert concept sketch into final presentation drawing
Module Aim
You will learn sketching for ideation and exploring creative variations in product forms. This knowledge applies to product, communication, and animation design.
Task Details
Location: School and Home Grouping: Individual + Groups of 3-4 for school, individual for home Equipment: Smartphone, sketchbooks, paper, drawing paper, chart paper, sticks, soft aluminum wires, scissors, pencils, clay
Exposures:
- Idea Sketching by Scientists and Designers
- Film on ‘Powers of Ten’ based on book Cosmic View
- Product Design Creative Ideas for Scissors or Cycles
Task 3a: Sketch Different Ideas of Sun-Dials
Background: Sun represents element of nature – ‘Fire’ and is source of energy
Steps:
- List Sun names: Make list of at least 12 different names for Sun in our culture Examples: Surya, Ravi, Bhanu, etc.
- Understand sun-dials:
- Figure out how sun’s position tells time of day
- Understand how shadows formed by objects tell time
- Study ancient sun-dials: Look at how they worked
- Identify two parts needed:
- The object (creates shadow)
- The surface (where shadow falls)
- Think of shape alternatives:For the Object:
- Linear object (stick, pole)
- Planar object (flat shape)
- 3-Dimensional object (solid form)
- Planar (flat)
- Curved (bent)
- With designs showing time
- Reflecting region/place characteristics
- Sketch alternatives: Create at least 3 to 5 different ideas on A4 sheets
Output: Alternative sketches of sun-dials
Task 3b: Design a Portable Sun-dial
Work in groups of 3-4
Steps:
- Share ideas: Look at all group members’ ideas
- Categorize: Group similar ideas together
- Discuss combinations:
- Can ideas be combined?
- Can one idea be improved?
- All ideas are valuable – don’t be possessive
- Make it portable:
- How to make it small enough to carry?
- How to make it comfortable?
- Consider wearability: Can it be worn on body?
- Finalize concepts: Choose 2-3 ideas to develop
- Create final sketch: Draw chosen product idea
- Make model: Use chart paper/sticks to create physical model
Design Tips:
- Transparent umbrella with tip?
- Use of lens?
- Coconut leaves for wristwatch?
- Triangle on circle?
Output: Photograph of both sketch and final model
Task 3c: Convert Concept Sketch into Drawing
Work individually at home
Goal: Present final idea/concept as beautifully as possible
Steps:
- Create drawing: Make drawing on A4 paper using 0.5 ink pen
- Add color: Color using color pencils
- Label parts: Mention different parts of your concept
- List materials: Write what materials are used
- Name your concept: Give it an interesting name
- Describe usage: Write in few words how it tells time
Output: Finished sketch/drawing of final idea along with model
Questions to Think About
- What design thinking principles were used?
- How did sun-dials help people? Why were they needed?
- Are they relevant today?
- Can we make something in digital format with same outcome?
- Can you use quick sketching for trying alternate concepts?
- Will you start a sketchbook to document ideas and thoughts?
Assessment Criteria for Module 3
Understanding Sun-dials (Individual):
- Beginning: Needs to understand concept
- Developing: Vague understanding
- Promising: Limited understanding
- Proficient: Shows understanding
- Excellent: Detailed understanding of shadow formation and sun-dial use
Designing and Sketching (Individual):
- Beginning: Needs to complete sketch
- Developing: Limited design and operation, basics not clear
- Promising: Complete sketch with limited basics, lacks detail
- Proficient: Fair understanding of design process and sketching
- Excellent: Clear showcase of design process and sketching basics
Shape Alternatives (Group):
- Beginning: Needs to present complete design
- Developing: One sketch, very basic variations, no alternatives
- Promising: 2 sketches, limited variations, few alternatives
- Proficient: 3 sketches, fairly explores variations, some alternatives
- Excellent: 4-5 sketches, explores creative variations, different alternatives (linear, planar, 3D, curved surfaces)
Sensitivity to Creative Concepts (Group):
- Beginning: Poor sensitivity
- Developing: Very limited sensitivity
- Promising: Average sensitivity
- Proficient: Shows sensitivity
- Excellent: Heightened sensitivity to creating variations
Module 4: Introduction to Design Thinking Process and Environmental Design Project
Time Required: 6 hours at school + 3 hours at home
Module Introduction
Design Thinking is a method to solve problems using a process. It involves five phases:
- Observe/Empathise/Research
- Understand/Analyse/Define
- Ideate/Alternate/Create
- Build/Prototype/Detail
- Evaluate/Reflect/Implement
You will apply this process to solve a problem related to your school environment.
Module Aim
You will understand basics of design process and apply it to identify and solve problems in your immediate environment. This can be applied to any field – economics, products, services, health, environment, and more.
Task Details
Location: School and Home Grouping: Groups of 3-4 for school tasks, individual for home tasks Equipment: Smartphone, sketchbooks, paper, drawing paper, chart paper, sticks, soft aluminum wires, scissors, pencils, clay
Exposures:
- What is the Design Thinking Process
- How to use Sticky notes to Categorize information + mind-mapping
- Design Case Study using Design Thinking process
Task 4a: Identify Problems in School Environment
Work in groups of 3-4
Focus Areas:
- Facilities
- Artefacts
- Buildings
- Greenery
- Playgrounds
- Laboratories
- Classroom spaces
- Cycle stands
- Common spaces
Steps:
- Choose focus area: Each group looks at one or two areas
- Consider different viewpoints:
- Students
- Teachers
- Staff (watchman, maintenance, office staff)
- Visitors
- Parents
- Persons with disability
- Talk to people: Converse to find their difficulties
- Observe interactions: See how they use school environment
- Mark locations: Note places/spaces they use
- Document problems: Take photographs of observations
- Create table: Write observations in three columns
| Positive Aspects | Negative Aspects | Suggest Improvements |
|---|---|---|
- Use sticky notes method:
- Write each point on separate sticky note
- Classify into similar categories
- Arrange within categories by importance
- Mark interconnections between points
Alternative: Mind-mapping method
- Arrange points on different branches
- Order by importance
- Show interconnections
- Photograph arrangement: Take photo of sticky notes or mind-map
- Final selection: Identify problems you want to solve (at least 5)
Output: Summary in less than 5 presentation slides containing:
- Problem statement
- Photo/sketch documentation
- Table
- Categorization/mind-mapping
- Final list of solvable problems
Task 4b: Ideation and Creative Options
Work in groups of 3-4
Steps:
- Brainstorm solutions: Think of possible solutions for identified problems
- Sketch ideas: Draw out possible solutions
- Create matrix: Place solutions on this grid
         Easy to Implement → Difficult to Implement
Low Cost ↑
         |
         |
         |
High Cost ↓
- Collate ideas: Bring good ideas together
- Short-list: Select based on usefulness and ease of implementation
Output: Presentation in 3 slides:
- Alternate sketches
- Matrix
- Short-listed idea
Task 4c: Creating Scenarios and Mock-ups
Home: Individual work (3 hours) School: Group work (1 hour)
Steps:
- Select best solution: Choose from short-listed ideas
- Create scenario: Demonstrate in 5 steps how to use your idea
- Use characters to build scenario
- Make mock-up: Try creating using cardboard/easily available materials
- Detail the solution:
- Shape/form
- Materials
- List advantages/disadvantages
- How to implement/maintain
Output: Presentation in 3 slides:
- Scenario
- Mock-up
- Details
Task 4d: Final Design Solution Presentation
Work in groups of 3-4
Presentation Structure (12 slides total):
Slides 1-5 (Task 4a):
- Title/Problem statement with team member names
- Photo/sketch documentation
- Table
- Categorization/mind-mapping
- Final list of solvable problems
Slides 6-8 (Task 4b):
- Alternate sketches
- Matrix
- Short-listed idea
Slides 9-11 (Task 4c):
- Scenario
- Mock-up
- Details
Slide 12:
- Full References (learn how to do proper references)
- Acknowledgments – thank everyone who helped
Additional Activities:
- Make group presentation using slides in classroom
- Set up exhibition of projects in classroom/exhibition room
- Invite other staff and students to see your work
Output: Complete presentation (6-10 minutes duration)
Questions to Think About
- What are the most interesting phases of Design Thinking process?
- Can you apply what you learned to other places – home or neighborhood?
- Will you share information about Design Thinking Process with friends and cousins?
Assessment Criteria for Module 4
Problem/Issue Identification (Group):
- Beginning: Needs great deal of assistance to identify key elements
- Developing: Identifies key elements of a problem vaguely with assistance
- Promising: Identifies 2 problems and outlines objectives with assistance
- Proficient: Identifies 3 problems clearly with little assistance
- Excellent: Identifies 4-5 problems clearly with no assistance
Ideation and Observation (Group):
- Beginning: Needs great deal of assistance to interact and observe
- Developing: Needs some assistance to interact and note observations
- Promising: Develops strategies with assistance
- Proficient: Develops strategies with little assistance
- Excellent: Develops insightful strategies with no assistance
Analysis and Documentation (Individual):
- Beginning: Needs great deal of assistance
- Developing: Documents representation with assistance
- Promising: Documents 2 representations with assistance
- Proficient: Documents 3 representations with little assistance
- Excellent: Documents 4-5 representations accurately with no assistance
Presentation (Group):
- Beginning: Needs lot of assistance, 2-3 slides, limited solutions
- Developing: Needs some assistance, 4-5 slides, appropriate solutions
- Promising: Average skills, 6-8 slides, appropriate solutions
- Proficient: Shows skills, 9-11 slides, innovative solutions
- Excellent: Creative skills, 12 slides, very innovative solutions
Student Feedback Form Components
Students assess their own learning using these categories:
Rate your effort, knowledge, and understanding:
- Inadequate
- Fair
- Good
- Very Good
- Exceptional
Agreement statements:
- I enjoyed doing the activity
- I understood design principles while doing task
- I liked trying different creative variations
- I can apply design thinking to problem solving
- I enjoyed working in collaboration with group
Reflection questions:
- What I liked the most
- What can be done better
- What can be added/changed
Teacher Feedback Form Components
Teachers provide feedback on:
Delivery of exposure modules:
- Easy to deliver?
- Level of agreement (Strongly Disagree to Strongly Agree)
Conducting task activities:
- Easy/satisfying/enjoyable?
- Level of agreement
Assessment:
- Any issues faced?
- Level of agreement
Additional inputs:
- Common questions from students
- Suggestions for improving tasks
- Other suggestions
Download Mind Map
Visit our Class 6 Skill Development page for free mind maps of all Chapters